Site logo

A collection of things.
By Chris James Martin

Getting Started with Kitty

08 Jan 2025 — Incine Village, NV

Hello Kitty!

I’m cheating a bit and writing/posting this a day late, but Kitty is set up! The process was super easy, although I now understand that what Dan has shared on GitHub is a very simple example of what Kitty or an AI PA can do, and not the full extent of what he is doing… which makes complete sense, as people are different, this is a personal project, and it would take a massive product team to try and make it work for everyone. (and then it would also probably suck for everyone)

My first three morning questions from Kitty:

"What emotions are setting the tone for your morning, and can you identify their sources?"

"In consideration of your physical and emotional state, what's the key thing you would like to achieve today?"

"As you envision your day, is there any particular activity or short break you could incorporate to recharge?"

All three are clearly inspired by but not directly pulled from the default question set, and having been run through GPT they feel much more natural than the defaults. Weird, but huge thanks to Dan for being miles ahead of me in his thoughtfulness towards what to ask to help one write useful answers.

Tomorrow I’ll write more about how these initial questions immediately impacted my day, and some other thoughts about how I want to use Kitty in my day-to-day life.

Here are my notes on setting up Kitty, in case someone happens to be here wanting to set up their own. Dan’s readme is thorough, but there were a few things that were slightly more involved for me because I hadn’t already set up an OpenAI Platform account.

Setup Steps

  1. Install kitty terminal. This is not required, you can run the AI PA in any terminal.

While it’s not mandatory to install the kitty terminal app, I’m doing it because I’ve never used kitty, and I want to see how it compares to the iTerm2 quake-style dropdown terminal I’ve been using for the last n years.

kitty binary installation instructions

Stopping myself from going down a rabbit hole of exploring kitty, I’m going to use it as-is after install and drop this thread here to explore customizing as a replacement for iTerm later.

  1. Fork and clone Dan’s Basic Kitty Journaling repo to your local machine.

  2. Set up an OpenAI Platform account and add some credits. I initially just created an API key, but it didn’t work for GPT-4 without credits, and I had to create a new API key after adding credits, the existing key didn’t automatically start working.

  3. Follow the rest of the instructions in the installation section of the readme.

Working Towards Sustainable Indepence

07 Jan 2025 — Alpine Meadows, CA

Getting Started

This will have to be short, but I need to get started.

Stepping Away from Scenery

In June 2024, I stepped away from my latest professional role as co-founder and head of engineering at Scenery. It was a friendly parting of ways, with 5 years of work completed and a great person available to step in. I knew that I wouldn’t be able to give family and the company the time and focus they each needed through the summer, and I didn’t want to do both poorly.

Later, while describing some issues that were concerning me, including heightened anxiety, poor sleep, and others, my wife pointed me to a few detailed descriptions of burnout. I didn’t realize there were so clearly defined definitions, but yep, that was me; juggling family, startup work, and trying to find time for physical activity was proving to be too much for a bit too long.

Summer Break

The summer was great. I stayed away from the computer, spent a bunch of time outside, and had a wonderful time not feeling stressed and enjoying family. Yay!

Returning to Routine

With the start of school in August, I settled into the routine of getting the kids to school, then sitting down with at the computer for a few hours with the goal of exploring and educating myself on tech that I wasn’t able to pursue while working on Scenery. I’ve pretty successfully done this, but haven’t produced much more than a bunch of exploratory projects (and a bunch of learning on what works and what doesn’t). I still want to roll the hundreds of hours of exploratory work into a shippable project or two, but I’ve found that I need to focus on structure now to give myself some accountability and track what I’m doing.

I also had the opportunity to contract with the Scenery team as they transitioned into new roles with Adobe, which was awesome and I’m so happy for the outcome and to be able to close that chapter with the team.

Goals and Plans

But now, for that accountability and tracking.

My Goal

Spend ≤ 50% of my time each day on the computer producing digital work, and the rest on family and healthy active activities. Ideally both sides of the day can also generate income. Contracting is always an option, but my (digital) goal is for personal projects to produce income as well.

Unfortunately, I’ve always been more driven by curiosity and learning than income generation, so I have some growth to do to stop stopping when my questions are answered and turn my work into finished projects.

Immediate Plans

My to-do list has had a bullet of “set up AI assistant” on it for a few months now, so I’m going to do that. This journal post is an attempt to force myself to follow through. I don’t think anyone will read it, but I’ll know it’s here.

I’m inspired by Daniel Catt, and have been impressed with his explorations of how to best use different forms of social media, video, and writing; and now the addition of AI to track projects, etc. I’m going to see if his “Kitty” assistant can be a useful part of my workflow. My next step is to set that up. Hopefully, I don’t waste too much time coming up with a clever name.

My 50% computer time is nearly up, and I have a Ski Coaching clinic to get to. I guess I can call today a success?

Tomorrow

Write an update on setting up my version of Kitty.

Serverless Auth: OpenAuth on AWS with SST

17 Dec 2024 — Truckee, CA

I’ve been playing with a bunch of “serverless” solutions lately. I used Amplify to configure and bootstrap various AWS services for Scenery and the projects that preceeded it, and I’d say it provided equal parts convenience and frustration.

As a learning exercise, I recently used Amplify gen2 to deploy an OIDC wrapper around the Flickr API as a next.js app. It worked, and served it’s purpose of refreshing my memory on how OAuth2 and OIDC work while giving me an excuse to play with next.js, but I wouldn’t use the final product for a production application. It also convinced me that it’s time to try out SST as a replacement for Amplify. Let’s see if we can find a bit more convienience and less frustration.

Enter SST’s OpenAuth. Let’s give it a try as an auth service and explore SST in the process.

I’m going to depoy OpenAuth as it’s own standalone service on AWS using SST.

Setup SST

  1. If you haven’t used SST before, read through the workflow and configure your IAM credneitals.
  2. Create a new directory for our project: mkdir openauth && cd openauth.
  3. Initialize SST: npx sst@latest init - use the default options: vanilla template and aws.

Add the OpenAuth Component

In the run function of sst.config.ts add:

const auth = new sst.aws.Auth("MyAuth", {
  authorizer: "src/authorizer.handler"
});

Authorizer

  1. Add OpenAuth npm package: npm i @openauthjs/openauth.
  2. Create a file at src/authorizer.ts: mkdir src && touch src/authorizer.ts.

This authorizer is based on the lambda example, with a few changes because we’re using the auth component which creates the dynamodb table and links it to the authorizer automatically.

import { authorizer } from "@openauthjs/openauth"
import { handle } from "hono/aws-lambda"
import { subjects } from "../../subjects.js"
import { PasswordAdapter } from "@openauthjs/openauth/adapter/password"
import { PasswordUI } from "@openauthjs/openauth/ui/password"

async function getUser(email: string) {
  // Get user from database
  // Return user ID
  return "123"
}

const app = authorizer({
  subjects,
  providers: {
    password: PasswordAdapter(
      PasswordUI({
        sendCode: async (email, code) => {
          console.log(email, code)
        },
      }),
    ),
  },
  success: async (ctx, value) => {
    if (value.provider === "password") {
      return ctx.subject("user", {
        id: await getUser(value.email),
      })
    }
    throw new Error("Invalid provider")
  },
})

export const handler = handle(app)

Subjects

  1. Add the valibot npm package: npm i validbot.
  2. Create a file at src/subjects.js: touch src/subjects.js.
import { object, string } from "valibot";
import { createSubjects } from "@openauthjs/openauth";

export const subjects = createSubjects({
  user: object({
    id: string(),
  }),
});

Run SST dev mode

Run SST dev to configure AWS resources and run the app in dev mode.

npx sst dev

Once SST has deployed all of the AWS resources needed for OpenAuth, it will output a URL you can use to test the authorizer. It will look similar to this:

https://[uuid].lambda-url.us-west-2.on.aws

Add /.well-known/oauth-authorization-server to the url and open in a browser to test that your OpenAuth service is up and running. You should see something like this:

https://[uuid].lambda-url.us-west-2.on.aws/.well-known/oauth-authorization-server

{
  "issuer":"https://[uuid].lambda-url.us-west-2.on.aws",
  "authorization_endpoint":"https://[uuid].lambda-url.us-west-2.on.aws/authorize",
  "token_endpoint":"https://[uuid].lambda-url.us-west-2.on.aws/token",
  "jwks_uri":"https://[uuid].lambda-url.us-west-2.on.aws/.well-known/jwks.json",
  "response_types_supported":[
    "code",
    "token"
  ]
}

Congratulations, you have successfully set up a basic OpenAuth service! You should now be able to set up an Auth Client to use with your shiny new OpenAuth server.

Filed Under: I can't believe I live here.

27 Mar 2015 — San Francisco, CA

From Above

Good greif.

Flickr Heatmap Tiles in Satellite Eyes

11 Apr 2014 — San Francisco, CA

I love Satellite Eyes. I’ve been using it for the last few years(?) to beautify my desktop with local Stamen Watercolor Maps.

When I saw these Flickr heatmap tiles by Eric Fischer, I immediately wanted them as my desktop. Here’s how to do it.

  1. If you haven’t already, install Satellite Eyes.
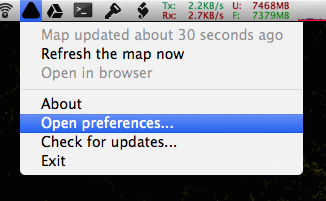
  2. Head to the Satellite Eyes preferences.

    Sattelite Eyes Menu

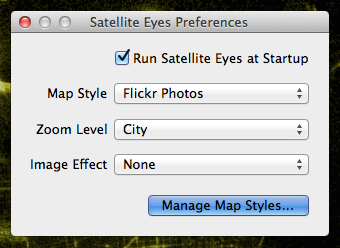
  3. Click “Manage Map Styles…”

    Sattelite Eyes Preferences

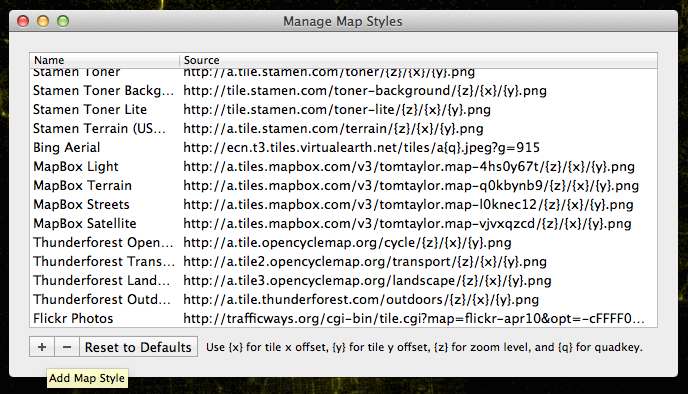
  4. Add a new map style, set the source to:

    http://trafficways.org/cgi-bin/tile.cgi?map=flickr-apr10&opt=-cFFFF00%20-M%2037%20-B12:0.0066:1.0119%20-G0.5&z={z}&x={x}&y={y}

    Sattelite Eyes Map Styles

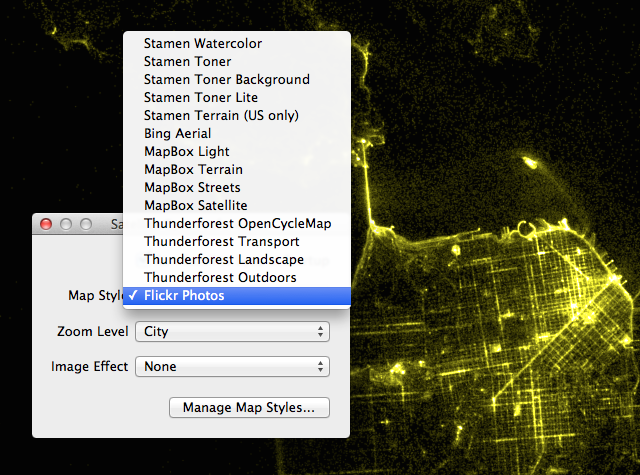
  5. Set Satellite Eyes to use the new map.

    Sattelite Eyes Select Map

  6. Enjoy!

Virtualenv with Virtualenvwrapper on Ubuntu

30 Mar 2013 — San Francisco, CA

I’m a big fan of using virtualenv to create isolated environments for Python projects. Here’s how I set everything up on Ubuntu 12.10.

Install pip

sudo apt-get install python-pip

Install virtualenv

sudo pip install virtualenv

Create a dir to store your virtualenvs (I use ~/.virtualenvs)

mkdir ~/.virtualenvs

At this point you are all set to use virtualenv with the standard commands. However, I prefer to use the extra commands included in virtualenvwrapper. Lets set that up.

Install virtualenvwrapper

sudo pip install virtualenvwrapper

Set WORKON_HOME to your virtualenv dir

export WORKON_HOME=~/.virtualenvs

Add virtualenvwrapper.sh to .bashrc

Add this line to the end of ~/.bashrc so that the virtualenvwrapper commands are loaded.

. /usr/local/bin/virtualenvwrapper.sh

Exit and re-open your shell, or reload .bashrc with the command . .bashrc and you’re ready to go.

Create a new virtualenv

mkvirtualenv myawesomeproject

to exit your new virtualenv, use deactivate.

Switch between enviornments with workon

To load or switch between virtualenvs, use the workon command:

workon myawesomeproject

You can read more about virtualenv here and virtualenvwrapper here. You might also want to look at this very similar (and probably better) python guide post.

Questions?

Photo Hack Day SF — The Plan

14 Jul 2012 — San Francisco, CA

En Route to Photo Hack Day SF

I love hack days. I usually go into these things with either no idea, or an idea that’s been bubbling in my head and will almost certainly be too ambitious for a day of hacking. Today is the latter, this should be fun.

A few months ago Cal built http://thisismyj.am, a parody of http://thisismyjam.com. This triggered the domain-buying lever in my brain and I wound up with http://thisismycam.com, which has been parked ever since. The sliver of an idea that inspired the domain purchase is a site that hooks up to Flickr, looks at a user’s photos, and builds a profile of all the cameras that they’ve used. Simple, right?

The plan, pull in photos, check exif, pull in camera info from amazon, build some pretty pages to display it all. Keep an eye on http://thisismycam.com for progress.

Fix MenuMeters for OSX Lion

14 Jun 2011 — San Francisco, CA

Update: The current version of MenuMeters (1.5) supports Lion. Get it here.

MenuMeters is one of those little things that I must install immediately after any fresh install of OSX. Unfortunately, the current build doesn’t run out of the box on OSX 10.7 “Lion,” but it’s easily fixed.

The problem lies with the hack MenuMeters uses to insert menus into the OSX menu bar, MenuCracker. We need to update the version included with MenuMeters to the latest version.

  1. Go ahead and install MenuMeters if you haven’t already; make note of where you install it (/Library or ~/Library).
  2. Download the latest version (currently 2.2) of MenuCracker from SourceForge.
  3. Replace MenuCracker.menu in (~)/Library/PreferencePanes/MenuMeters.prefPane/Contents/Resources/ with the version you just downloaded. If you’re lazy, you can paste this into your terminal:

     sudo cp -R /Volumes/MenuCracker\ 2.2/MenuCracker.menu /Library/PreferencePanes/MenuMeters.prefPane/Contents/Resources/
    
  4. Close/(re)Launch System Preferences, and enable MenuMeters. Boom.

How To Install wkhtmltopdf PHP Bindings

16 Mar 2011 — San Francisco, CA

This isn’t a difficult process, but I’m sure I’ll need it again, so here it is.

Pre-requisites:

  1. Download the latest version of libwkhtmltox and the source of wkhtmltopdf from Google Code.
  2. Copy lib/libwkhtmltox.so from libwkhtmltox to /usr/local/lib.
  3. Copy include/wkhtmltox from wkhtmltopdf to /usr/local/include.
  4. Run the following command (just to make sure it’s loaded):

     $ldconfig -v | grep wkhtml
    

PHP Bindings:

  1. Grab php-wkhtmltox from GitHub.
  2. Install.

Installation:

If development tools aren’t installed:

$apt-get install build-essential php5-dev  # (ubuntu)
$phpize
$./configure
$make install

Add extension=phpwkhtmltox.so to php.ini.

P.S. These instructions are for Ubuntu. If you’re on CentOS, things are more difficult, good luck.

Rainy Thursday

24 Feb 2011 — San Francisco, CA

Rainy Thursday

Even on a rainy Thursday in February, San Francisco is beautiful.